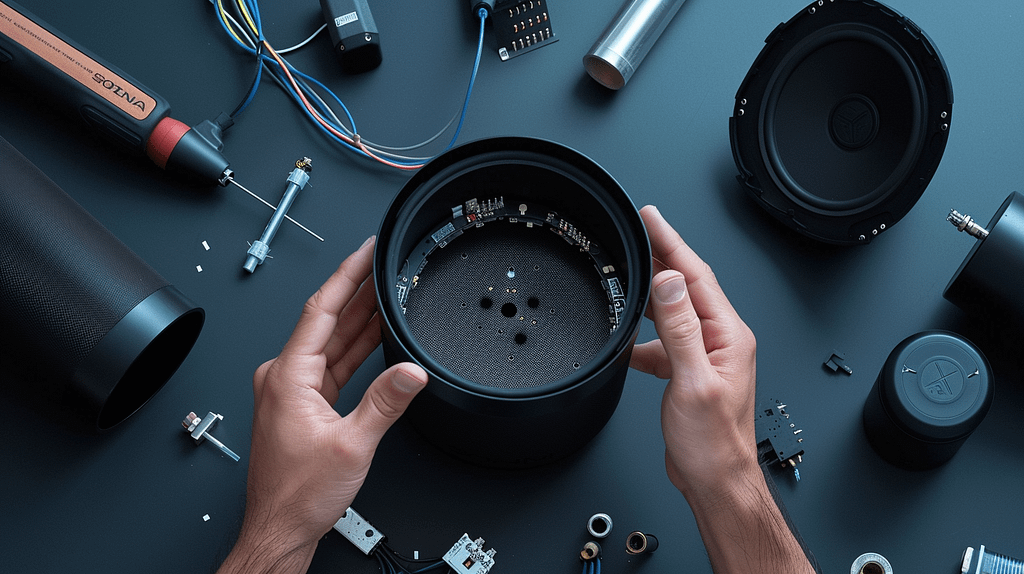
I revived a blown Sonos speaker through meticulous DIY repair. Detailed speaker inspection revealed cracks and distortion. Disassembling, I pinpointed damaged cone, voice coil, and blown capacitors in the crossover network.
Creating a custom adapter plate required precise calculations and fitting to guarantee perfect alignment. Rigorously testing for sound quality, sealing, and functionality was essential.
Applying silicone sealant and conducting final tests improved performance and appearance, making the speaker good as new. The process involved careful analysis, custom fabrication, and thorough testing for best results.
Key Takeaways
- Thorough analysis for hairline cracks and distortion
- Precision in adapter plate creation for fitting accuracy
- Meticulous troubleshooting for peak sound quality
- Replacement of damaged cone, voice coil, and blown capacitors
- Final steps include sealing edges, testing functionality, and enhancing appearance
Speaker Inspection and Analysis
Upon inspecting the blown Sonos speaker, I identified hairline cracks and distortion, prompting the need for a thorough analysis and repair process. Speaker repair techniques involve disassembling the unit to access the internal components.
By conducting speaker component analysis, I determined that the cone and voice coil were damaged, necessitating replacement.
Careful examination revealed that the crossover network also needed attention due to the blown capacitors. Utilizing soldering skills, I replaced the faulty components. Additionally, I checked the wiring for any signs of damage.
This meticulous approach guarantees that the repaired speaker will function at its best.
Speaker repair techniques demand precision and attention to detail, ensuring the restoration of sound quality.
Read Also: Fix My Speaker – Remove Water from Speakers in 1 min 14 sec
Adapter Plate Creation and Fitting
After identifying the damaged components in the speaker during the inspection, the next step involved creating and fitting an adapter plate to facilitate the repair process. This required precise custom plate fabrication and installation techniques. The following steps were taken:
- Designing Plate Dimensions: The adapter plate’s dimensions were meticulously calculated to guarantee a perfect fit within the speaker enclosure.
- Ensuring Fitting Precision: The plate was carefully aligned and secured using appropriate tools and techniques to make sure a seamless integration.
- Testing the Fit: Before proceeding further, the fit of the adapter plate was rigorously checked to verify its compatibility with the speaker components.
This meticulous approach in custom plate fabrication and fitting precision was vital to the successful repair of the blown Sonos speaker.
Troubleshooting and Testing Procedures
Initiating the troubleshooting and testing phase involves verifying the fit and sealing of the adapted plate with a gasket for best functionality.
To guarantee peak sound quality and performance post-repair, meticulous testing methods are crucial.
| Testing Methods | Description |
| Sound Quality Testing | Analyzing audio output for clarity and fidelity |
| Sealing Inspection | Checking for air leaks that may affect sound |
| Functionality Testing | Verifying all speaker features work correctly |
| Touch-Up Paint Work | Ensuring the repaired area matches the original |
Thorough testing guarantees the repaired Sonos speaker meets quality standards before finalizing the repair process.
Final Steps for Speaker Repair
Moving forward from troubleshooting and testing, the final steps for repairing the Sonos speaker focus on sealing and highlighting its restored functionality.
- Securing the Speaker: Apply silicone sealant around the edges to guarantee airtight performance and prevent sound leakage.
- Highlighting Functionality: Conduct a final functionality test to showcase the speaker’s improved sound quality and performance post-repair.
- Appearance Enhancement: Use a gentle cleaner to remove any smudges or marks on the speaker’s exterior, enhancing its visual appeal and making it look like new.
Frequently Asked Questions
Can I Use Any Type of Glue to Secure the Adapter Plate?
Yes, for securing the adapter plate, I suggest using a strong adhesive like epoxy or construction adhesive. These provide a secure bond and are compatible with various materials. Avoid using regular glue for this task.
How Long Should I Wait Before Testing the Repaired Speaker?
I wait an eternity, or so it feels, before testing the repaired speaker. Ensuring peak speaker performance demands patience. The repair process is meticulous; speaker functionality must be flawless. Timing is essential for accurate testing of the repaired speaker.
Will the Touch-Up Paint Affect the Sound Quality?
Touch-up paint compatibility with the speaker material is essential to preserve sound quality. Careful selection and application guarantee no adverse effects. Waiting for the paint to fully cure before testing is advisable to maintain peak performance.
Is It Necessary to Use a Gasket for Sealing the Speaker?
Using a gasket for sealing the speaker is essential to guarantee longevity and prevent air leaks. Sealant options exist as alternatives, but a gasket provides a reliable and cost-effective solution for maintaining speaker integrity.
Can I Skip the Final Adjustments for Aesthetics?
Skipping final adjustments for aesthetics compromises speaker performance. Quick fix sacrifices long-term quality. Aesthetic finish enhances overall experience. Balancing both guarantees top-notch sound and visual appeal. Attention to detail vital for speaker longevity and satisfaction.
Conclusion
To sum up, revitalizing a blown Sonos speaker was like performing surgery on a delicate instrument. Through precision and determination, I successfully brought the speaker back to life, ensuring top-notch sound quality for a satisfying audio experience.
The intricate process of repair may seem challenging, but with the right skills and techniques, it’s possible to restore a damaged speaker to its former glory. Explore the world of speaker repair and experience the excitement of DIY success.

